Improve quality control in the supply chain with 3D scanning

Want to know more about the challenges of quality control in the supply chain? In this article you will learn more about it and how ZEISS T-SCAN hawk 2 and ZEISS INSPECT software support the efficient quality assurance of different parts.
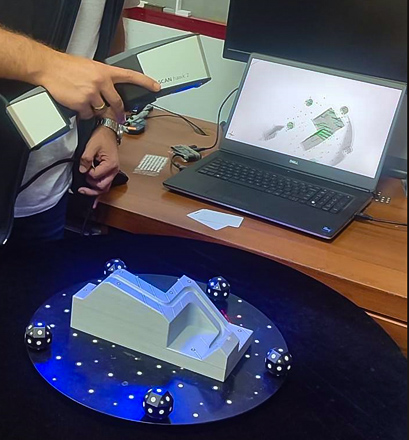
T-SCAN hawk 2 scanning grey plastic part on a rotation table

Quality control in the supply chain

Our turkish partner InfoTRON took us to their customer KONVEYÖR – supplier for companies in the white goods and automotive ancillary industry. Since 1979, they deliver components and parts of different materials and geometries needed for various sectors. Optical scanners are already being used for quality control in order to verify the quality of the products supplied to the company and thus strengthen cooperation in the supply chain. Goods produced in-house can also be checked for defects before delivery to the customer. These products include intricate tubes, complex fixtures, and control device parts.

Accelerating quality control with 3D scanning

By measuring with optical scanners, KONVEYÖR aims to enhance their workflow efficiency. Here, an easy-to-use 3D scanner and metrology-grade precision are particularly relevant for satisfactory quality control. The previous quality control with another 3D scanner could not meet these requirements. The company had to compromise significantly on accuracy and practicality, as the previous 3D scanning system was not able to take into account the different material properties and capture accurate 3D data. Oftentimes, they wer compelled to conduct quality control on their products using a dulling spray. These actions not only compromised precision but also posed the risk of damage to their products. 

In their search for a suitable, precise solution that would eliminate measurement uncertainties and support additional interventions on the products, they found the new hand-held ZEISS T-SCAN hawk 2.

The lightweight and compact design of the scanner is particularly impressive, enabling universal use – regardless of the location. In addition, the use of scanning spray is no longer necessary thanks to the powerful laser technology. Any surface can now be scanned and inspected without any preparatory work.

Thanks to ZEISS T-SCAN hawk 2, we've accelerated our quality control processes by 80%.

Product evaluation in ZEISS INSPECT software

For the reporting to the supplier companies, KONVEYÖR uses the certified ZEISS INPSECT software. The solution delivers repeatable dimensional accuracy for each product. This ensures error-free deliveries and allows to proactively identify and address any issues that may arise, preventing recurring workflow problems.
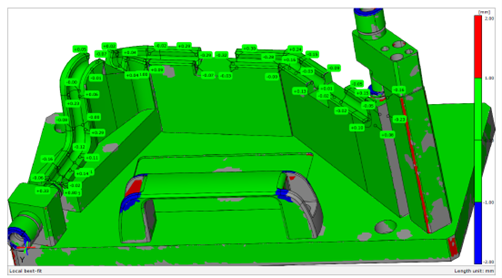
Color plot of plastic part

Get your hands on
ZEISS T-SCAN hawk 2

Learn more about the hand-held 3D scanner by finding your local dealer now.

What's your thoughts on this?

Discuss with us on LinkedIn

Trending on #HandsOnMetrology

Share article

Join our newsletter

Be the first to know what's new

Just a second!

Thank you for your interest. If you provide your contact info, we will inform you whenever a new episode of our Geek Talk is available.